The Opal and Khoros integration hinges on three key elements during configuration: Initiatives, Accounts, and Labels.
Listed below are details about each to help you get up to speed right away.
Note: To configure an integration, your Opal must first be linked to your Khoros Instance. Please contact your account manager or Opal support at support@workwithopal.com to discuss integrating your Opal and Khoros environments. Once complete, your account manager will assist you with the below steps.
Initiatives
A project or effort around which social media events are built. Initiatives can be used to group accounts, limit user access to sections of the application, or segment reporting to align with specific social media efforts.
Initiative Details:
Opal can connect a workspace to a single Initiative
Opal can connect a workspace to a multiple Initiatives
Opal can connect multiple workspaces to a single Initiative
Opal can connect multiple workspaces to a multiple Initiatives
Accounts
An account is the specific page or profile that you’ll use on a channel. You may have more than one account for each channel.
Facebook
Twitter
Linkedin
Instagram
Google+
Pinterest
Sina Weibo
Labels
An account is the specific page or profile that you’ll use on a channel. You may have more than one account for each channel.
Label Details:
All labels entered at the global level
Labels are organized in a hierarchy in Opal
Labels are flat in Khoros
Labels applied to a piece of content in Opal will be delivered to Khoros
Map Initiatives
When initiatives are added to Khoros, they must be synced by Opal in order to be properly mapped. Initiatives are Synced nightly PST and will appear in Opal the following morning. If you have a new Initiative to sync immediately, please send an email to support@workwithopal.com.
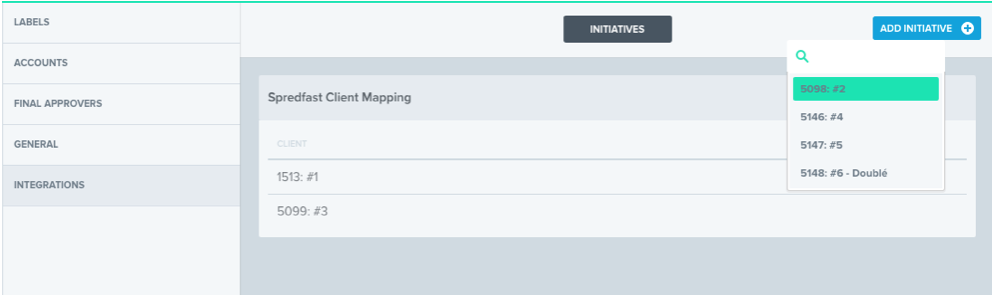
In your workspace click Configure then Integrations.
Click on the Add Initiative button.
Select the Initiative(s) you wish to map to your Workspace.
All currently mapped Initiatives are listed under Khoros Client Mapping. Accounts which are configured and synced within those initiatives can be linked from Khoros to Opal.
To remove an Initiative, hover over it in the list, then click Remove.
Note: Initiatives must be mapped before accounts are linked. Only accounts which are available in mapped initiatives will be able to link between Opal and Khoros.
Things to keep in mind when associating accounts with initiatives.
Accounts can be associated with multiple initiatives in Khoros. Opal will reflect the account's initiatives on the Workflow & Delivery tab under the initiatives dropdown. i.e. An account in 1 initiative in Khoros will only show 1 in Opal, an account in 3 initiatives in Khoros will show 3 in Opal.
If a new account is authenticated or an existing account is re-authenticated in Khoros it will need to be mapped in the Opal admin settings for the associated account. You can map the associated Opal account after Opal syncs with Khoros.
If an existing account is moved from one initiative to another initiative you will not need to do anything additional after Opal syncs with Khoros.
Note: We recommend that you contact the Khoros support team if you have questions regarding Khoros accounts and initiatives. The Khoros support team will be able to provide you with documentation to accomplish your initiative goals.
Link Accounts
New accounts must be synced by Opal and Khoros and may only be linked once per workspace in Opal. Accounts are Synced nightly PST and will appear in Opal the following morning. If you have a new Account to sync immediately, please send an email to support@workwithopal.com.
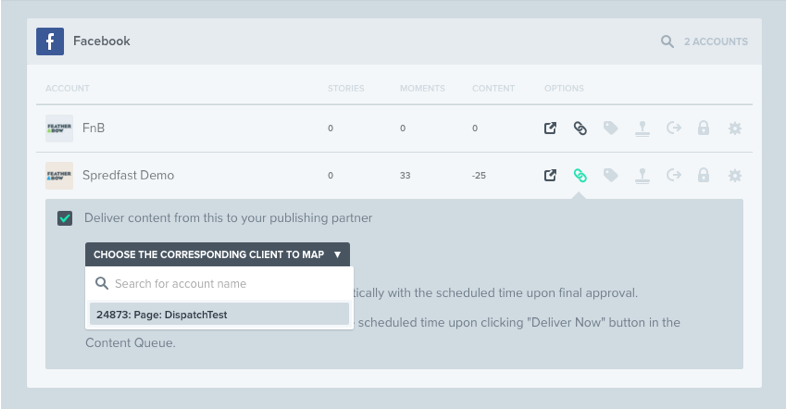
In your workspace click Configure then Accounts.
Click on the Chain Link Icon next to the account name in Opal.
Check Deliver content from this to your publishing partner.
Click the drop-down arrow to select the Khoros account you wish to link in Opal.
We recommend that you select Approved content will be delivered automatically with the scheduled time upon final approval to pre-select the Automatic Delivery option for all content created with this account.
Click the Chain Link Icon to close the drop-down.
Note: Once a Khoros account has been linked, you will not see it in the drop-down list.
Set Up Labels
Labels are a key component to your Opal + Khoros integration, however, it's important to know that labels are organized differently in Opal and in Khoros.
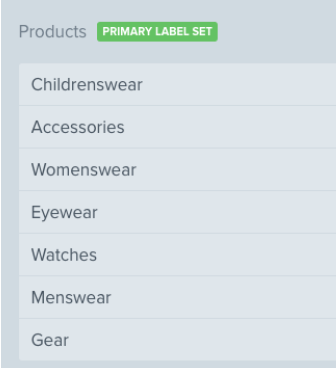
In Opal, Labels are a hierarchy that consists of label-sets and labels:
In Khoros, these labels are "flat" and there is no hierarchy:
You, or someone on your team, will be responsible for creating and maintaining labels in Khoros. With this in mind, labels should be formatted with the following flat structure:
Opal Workspace - Opal Label Set - Opal Label
If one of your labels is not matched up correctly and in the format above, Opal will fail to deliver the piece of content to Khoros.
Please remember that when you create a new label it must be added to Opal and Khoros.
If you would like an export of your Opal Labels contact Opal Support at support@workwithopal.com.
In order to deliver approved content from Opal to Khoros, you’ll need to ensure your labels are in parity between platforms. All Opal label sets and labels in your workspace must be entered into Khoros in parity.
Note: All Khoros labels and label sets do not need to be entered in Opal.
Map Labels
Opal Labels
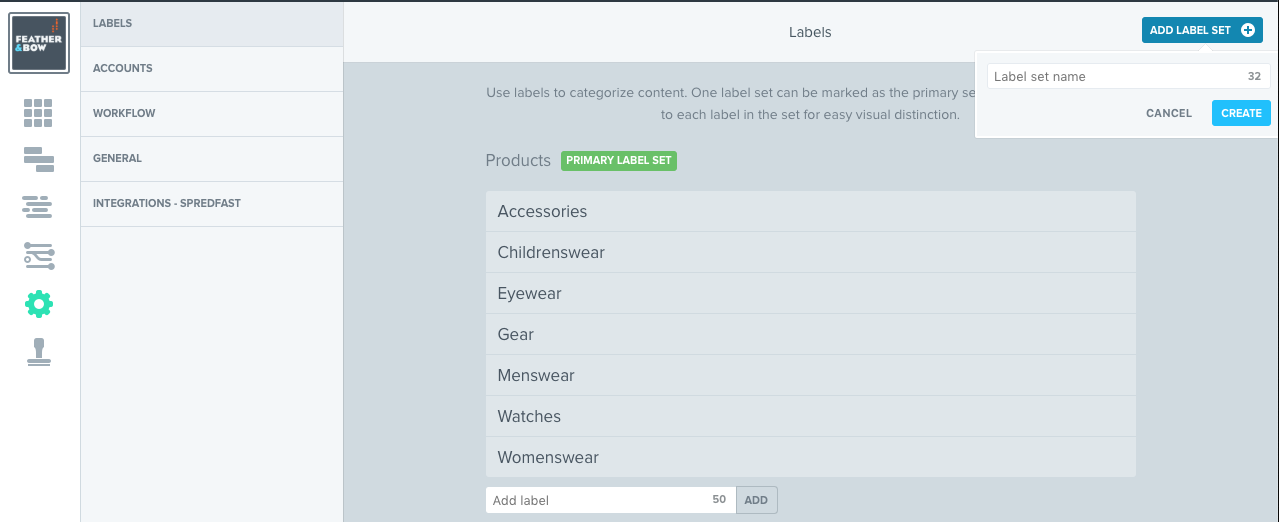
Your Opal Labels are found in your workspace under: Opal Options - Configure Workspace - Label Sets & Labels.
There you can add and access your labels and label sets.
Once labels are entered in Opal, via the blue “Add Label Set” button and the “Add Label” field, they should be created in parity in Khoros.
Note: You must be an admin to see the admin tab.
Important: When new labels are added to Opal, it is important to add them to Khoros as well.
Label Requirements
Two options are available to map labels between Opal and Khoros.
Label parity in both platforms, i.e. labels match exactly in Opal and Khoros. This is the default configuration.
Unique labels in each platform, i.e. labels do not match exactly in Opal and Khoros.
Tip: Set specific labels to optional in Khoros if it is not required for publication.
Note: Contact your CSM or Support if you would like to use the Unique labels set up or have questions about label mapping.
Khoros Labels
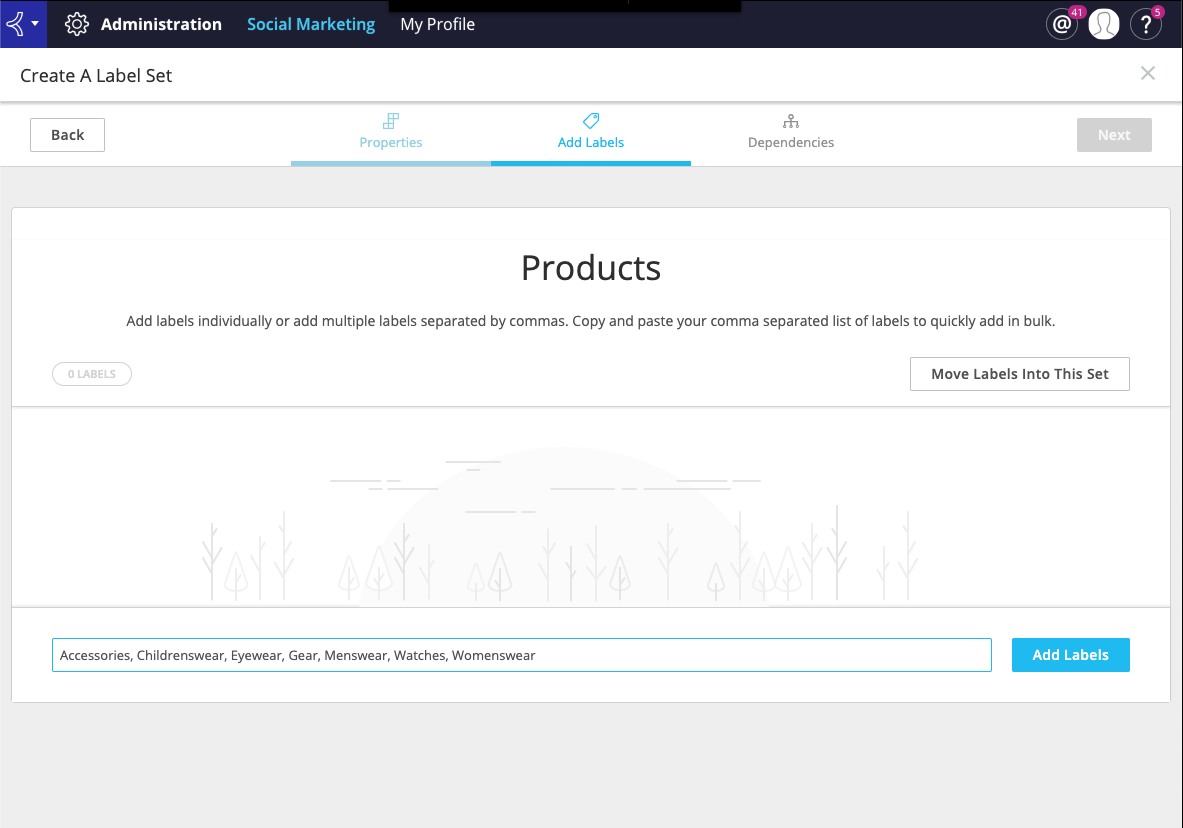
To create your Opal label sets and labels in Khoros:
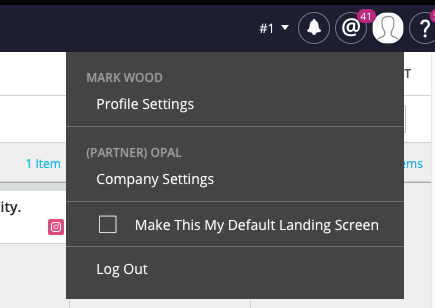
Navigate to Partner : Company Settings
Click “Labels”
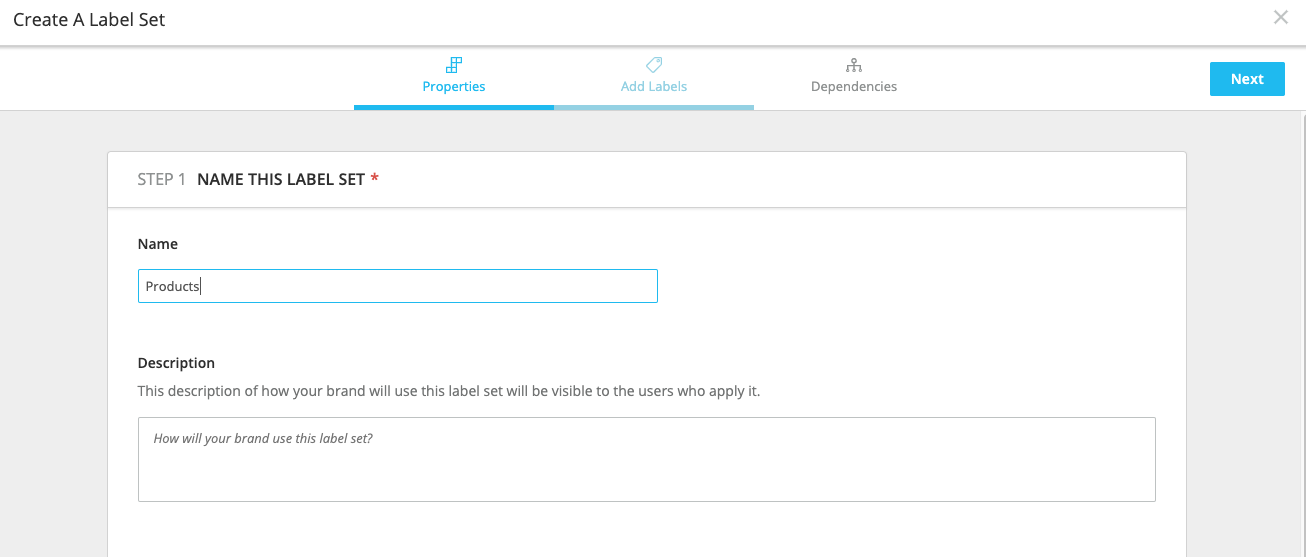
Click “Create A Set”
Give your label set the exact name from Opal. In this example, my Opal label set is “Products” so my Khoros label set is also named, “Products”
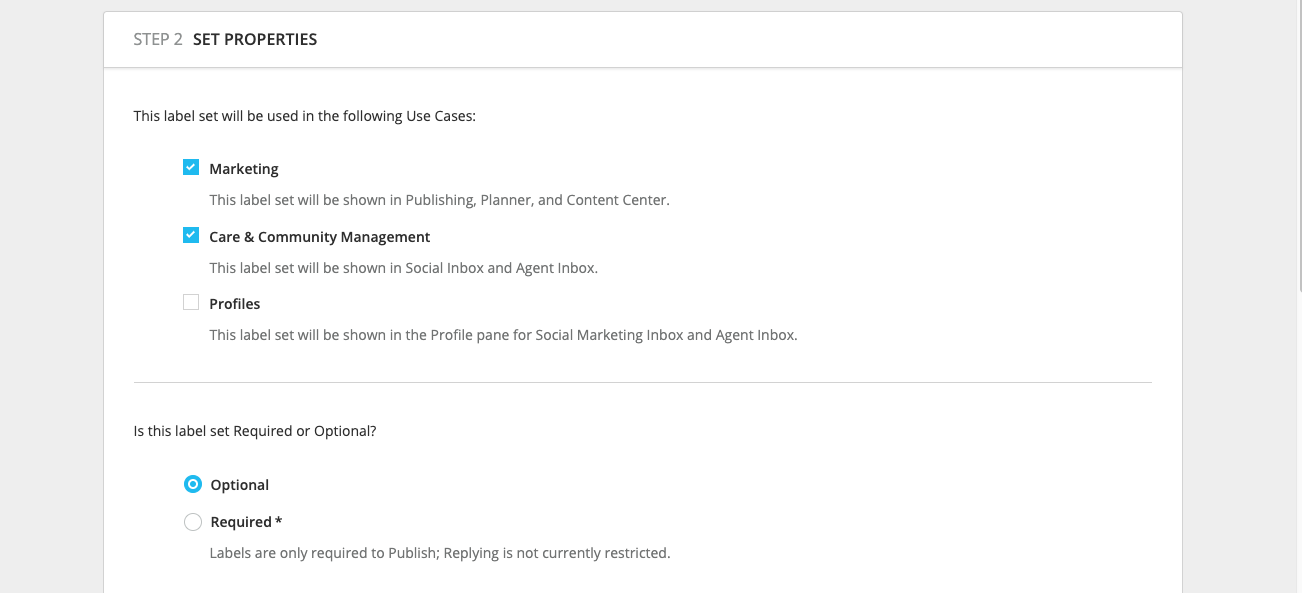
Make sure the label set is available for “Marketing"
If the label set is required in Opal, mark it required in Khoros. If the label set is optional in Opal, mark it optional in Khoros.
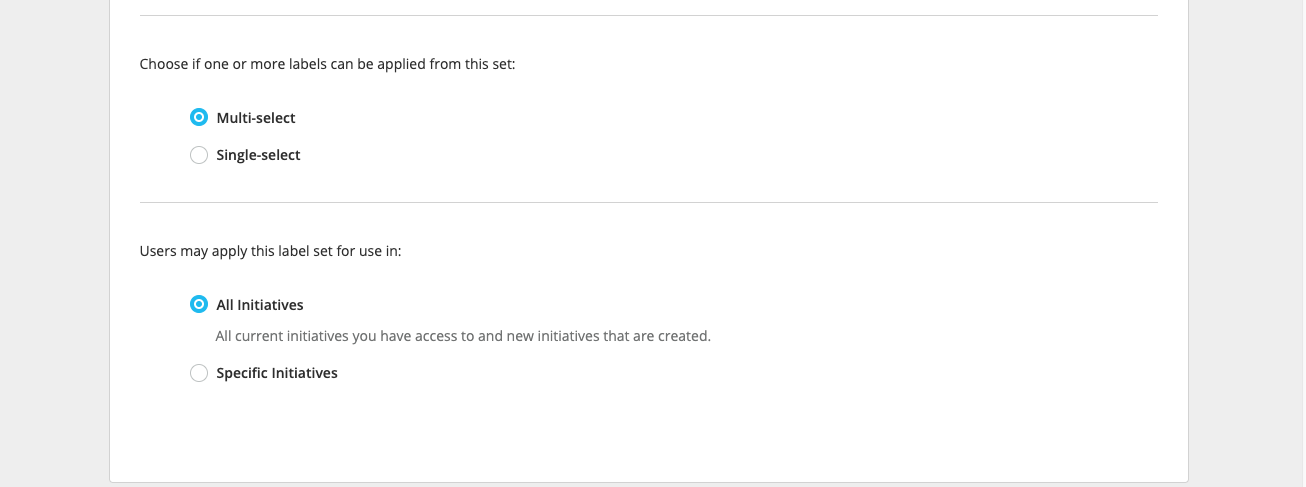
For “Users may apply this label set for us in” - ensure this is either marked “All Initiatives” or ensure the Initiative(s) you’re publishing to from Opal is/are checked under “Specific Initiatives”
Click “Next” to add labels
Add your Opal labels in the “Add Labels” field. Your Khoros labels must match your Opal labels exactly.Note: Opal Support or your Customer Experience Manager is able to export a csv of all your label sets and labels from Opal. Please reach out for assistance.
Check “No” for “Is dependent on another label set?”
Click “Done.”
Repeat for additional label sets and labels.
Once your labels and label sets are up-to-date and in parity in both Opal and Khoros, you’re ready to start delivering content!